Saturday, December 31, 2016

Tumbleweed Finish

Technically, I'm not completely finished as I stopped the binding process because I noticed that the light was perfect for taking some pictures of the quilting details.  Good thing I did as the sun went behind a cloud before I got to the full quilt view above.  In case you haven't seen the other posts about it, it is an improv quilt using up the scraps from the Desert Rose. The batting is cotton.  Backing muslin. Fabrics were NOT pre-washed to optimize texture from shrinkage.


About 1/4 way through McTavishing, I regretted the choice.  I like the motion and texture that it adds, but I think it detracts from the motifs it was supposed to show off.  After washing, however, it does highlight the squares.


 All that fuss for this motif, which isn't as noticeable as I would like.  It was totally worth the extra time I took to hand-quilt that inner fill.  In the real world, the texture difference is awesome.
 I really like these 4 fills.  The pebbles really pop, the brickwork is nice texture.  And the feathers.  I finally got them right!
I spent a lot of time fretting over this section.  In the end, I think it turned out really well, with just the right amount of variation in size & texture with the diamonds and pebbles.  The micro-feathers on the top green/brown was just nuts.  No regrets.
 I love these square flowers.  And that I could relax and not worry about perfect  lines on the dark green.  The paisley fill is one of the easiest for me to do and it adds a nice flow-ey feel.

The double leaf on the green/cream is hard to see but it was a new one for me and easy one to pull off.  Love the pebble stem and the wonky leaves.

My quilting theme for 2017 is Surprise Gifts and this is the first to be done with a plan to give it to the unsuspecting recipient sometime in the next few months.

Friday, December 30, 2016

Mosaic

Ever since I went to St Sophia's in Kiev, I've been fostering an idea for a mosaic quilt.  This is as far as I got on Monday. 

My original plan was a full sized quilt which would be a modified portrait of a friend and her husband finishing about 60".  As I started to draw out the draft, it became apparent that the scale I had in mind would make the pieces tiny, under 1/2", instead of the 1" pieces I wouldn't mind working with. 
I had scraps that I saved from the Desert Rose and Tumbleweed quilts that I ironed on to some fusible.   I remember now why I hate raw edge applique.  Many of the small pieces are popping off as I manipulate the fabric during the quilting process.

The weekend is coming up so maybe I'll be able to finish this wall hanging size version and share it within a day or 2.

Monday, December 12, 2016

Tumbleweed

My Desert Rose Leftovers quilt is progressing well.  I have transitionally named it Tumbleweed.

My experiment using embroidery thread was a success.  I has a wonderful shimmer in full light and is a bit thicker than typical thread.  I did buy embroidery needles and have had no thread specific problems.

The feathers above turned out so well that I officially announce that "I have mastered feathers".

I happen to LOVE this flower for squares.   It's a Lori Kennedy design that I used on Evolution.  My biggest challenge for this square was trying to keep my stitches even and medium in length.  When the stitches are short, they lose the shimmer from the embroidery thread.  I am learning that the fact that the lines aren't straight is no big deal.  After washing, it will look great.
The Ohio Star fussy quilting design turned out well.  Used the green embroidery thread on stars, and matching cream cotton thread on the background.  I was so unhappy with the planned stitching between the pods and the star points that I ripped it out and will be hand quilting that section. Don't judge me.  It's the only way to get both the color and texture that I want.


And then there was this.  It started with me following the swirl on the brown batik.  And it ended in a freaking ridiculous micro-feather.  In 2 colors. The green & brown together is 3 1/2".  I know.

 Here is the party from the back before the last round of Lea Day Paisleys below.
Back to work.  Hopefully some updates and progress in a week. 

Monday, December 5, 2016

Leftovers again

I took a break from the hand quilting to use up some leftovers.  You may remember that I severely over-bought fabric when I was considering changing the dark squares on the Desert Rose quilt.  My original plan was to make 3 giant Ohio Stars with the extra.  Then I realized that I had an abundance of what had been the corner blocks which when joined this way made some dandy 6" green squares.  I decided to keep the stars in proportion with the green squares so they finished at 18".   The pinwheels and squares on point were some leftover HST proving that I can't count when following my own directions.  The varigated looking stripe was made from the stripset remains from the Desert Rose star.  The checker board section is my least favorite, but a quick way to use up the abundance of squares from when I thought I was going to change to the mid brown.  Then I used up the over-cut strips.  And I added some dark brown and lime strips from the stash to balance things out.  This went amazingly fast, a couple hours at a time over the course of a Saturday doing other things.

I spent more time designing a terribly intricate quilting pattern.  I trolled my Pintrest collection of amazing machine quilting and borrowed ideas from multiple people.  Unfortunately, this needs to look symmetrical and the components are repeated 4-8 times in each of 3 blocks.  So I proceeded to work out some rather complex templates.  The star section needed 3 different ones, flipped front to back in order to transfer the whole design.
While my FMQ skills are improving, I was pretty concerned about if I was going to be able to pull off the plan.  I drew up one more to do a test piece.  I am pretty pleased with the feathers.  The pebbles are a little organic, but tolerable.  I need more practice on the swirlies.  And I realize that I will never be able to FMQ a straight line even when it's drawn.  I know there are people who use a ruler for that even with a domestic machine.  I'm not sure I'm that coordinated.

This sample used some wool batting so it has some lovely loft.  The final quilt will have cotton batting, so some of the imperfections with wrinkle away with the shrinkage.

I am hoping to get all more chores and errands done quickly today so I can get started on the quilting.

Friday, November 25, 2016

Desert Rose Piecing Finished

I had great hopes of getting this quilt pieced about a week ago so I could be quilting this Thanksgiving Weekend.  But then there was that math error.  I think that the work around turned out great.   In fact, better than the original plan in many ways.   But it did take a LONG time since I had to lay it all on the floor and make sure it was going to work out.   There was also a lot of unpicking of seams.  And twice I had had 2 blocks get a quarter turn off.  Of course, in the middle of the quilt.

I have posted pictures periodically on my Facebook for friends and family.   It's easy to tell the quilters from the non-quilters by the comments.  Non-quilters post things like "very pretty".  Quilters post "Too.Many.Points"  and "WTF"..

We're off to watch some football, but hopefully will get this sandwiched before the weekend is over and I can finally do what I like best.  Quilt.

Tuesday, November 22, 2016

Desert Rose Progress


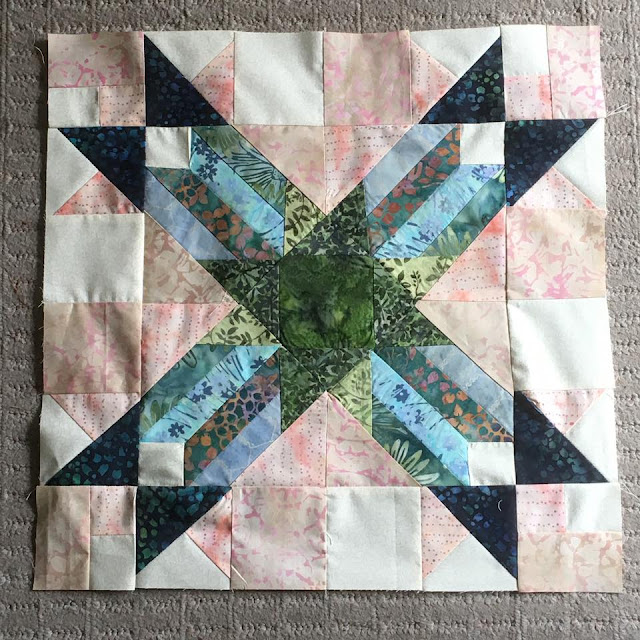
There's good news and bad news.   The good news is that I had this much finished by late afternoon on Sunday.  This is the center 12 blocks of the quilt.  I tried to pick the blocks with the best points. 

It will cover the top of a Queen bed.  There is another round of 18" blocks around this part to be the drape part of the quilt.

And then there's the bad news.  As I was headed to bed with visions of finishing this quilt on Sunday, it occurred to me that I seemed to be out of the dark green HST pieces that are the star points.  I searched again in the morning than double checked my planning page which confirmed my fears.  It appears that I made half as many as I need to finish the quilt.  

This alone would be annoying, but while I padded my yardage enough for the dark green and the pale background,  I don't have enough of the mid-background to finish the quilt to the edge.  The original plan being to continue the pattern all the way to the edges as in the picture below.  

 The bottom in this pic would be the outer border.
Oh, I just found a square inserted wrong in this picture.  Damn.


After considering a half dozen options, I went with this one.  All of the HST blocks are supposed to be green/mid, but this plan replaces half with green/light. (Not noticeable in these photos and only up close in person) But in the process, I decided to remove the green corner blocks so the outside edges would finish with points.  I've spent a lot of the day ripping out stitches. 

Monday, November 14, 2016

I spent my weekend trying to finish up block sets.   It made me realize whey there is no copy of a quilt with this pattern anywhere on the internet.  Because it is a royal pain in the butt.  Even with efforts to use clever techniques to minimize stretch, those blocks never had a chance of being square.


232 squares is a lot of trimming.


But it will be worth the time and effort for the final joining of the strip sets.

29  more final blocks to make.  Each with 29 blocks to sew.

How do I keep talking myself into these things?


Sunday, November 6, 2016

Pieces

I finished the first test block in the purchased fabrics and am, for the most part pleased with it.

Here's what the mock-up looks like.
At this point I had second thoughts about the dark brown squares.  It created the bold repeat I had planned for.   But is it too much?

So a week was spent considering options.

1) Terra Cotta.  Made the overall look very warm. Reads in a mid-tone. Tends to look very orange at a distance.

2) Original.  Boldest of the options.  Texture of the print preferred over all others among live viewers.

3) Picks up the other colors wanted, but reads as grey and makes the whole quilt look very cool colored.

4) A favorite print, but not enough contrast with the background fabrics, so it fades away.

A week and $30 later, I am back to the original plan.

Spent Saturday finishing cutting things out.

Tried a new HST tool from Quilt in a Day.  Unfortunately, I first encountered Elenor early in my quilting life and really dislike her presentation style so have ignored anything associated with the name.  My 6" ruler has gone missing and her 6 1/2" Triangle Square Up Ruler was what was available at the quilt shop where I went.   It is actually a very handy tool.  Since I quite like HST quilts, I see using it a lot in the future.

I discovered a major math error.   I had figured yardage before I changed the light green from a 2" square with a Y seam to 2 triangles.   Unfortunately that quilt shop is an hour away, and I was happily sewing in my PJ's, so I'll save that run for Monday.

It's not evident in this photo, but after I had about 1/2 of these sewn and pressed, I realized that I need to press the seams differently for the sake of quilting.

The one on the left is the original pressing which makes sense from a sewing standpoint.

But I want the pale sections to recede and I will be hand quilting, so I went back and pressed to the dark.


My plan for today is to finish all the piecing that I can without the stupid light green triangles.


Sunday, October 16, 2016

Desert Rose Designing

You know how much I hate piecing.  But in a weak moment, I agreed to consider making a quilt for a really, really good friend of mine.  There was some general discussion of color and theme.  Southwest but with green & blue.  This was what I came up with.  The original historic block "Desert Rose" was even busier, with 3 different colored triangles where I have the light blue stripes.  The way I made the prototype block had tons of Y seams that needed to go away for me to ever consider making another.   
When I set it out as a block to block format, I noticed That the corner blocks made their own stars.  And there is a secondary pattern in the background squares that reminded me of an Irish Chain.  
So I redesigned the block to play up on the secondary stars and the tan block diagonal.
While I really like this, I will look for a tan with more contrast.  And The white squares on the corners would look better as light blue.  

And when sending this mock up to the significant other of the intended recipient, the color scheme flipped.  Everything currently blue will become green and vice versa.  Will also aim for a darker tan for that diagonal line of blocks to stand out more. 


Sunday, October 2, 2016

Finished Churndash

My scrap project was mostly a success.   I used up the majority of the green scraps.  Ended up creating more scraps for the yellow background.  Pieced together some odds and ends of batting.  Used up some muslin on the back that I bought for a batik class,  Also used up 2.5 bits of random green and grey binding.


I am finally getting feathers to look the way they are supposed to.  Though I have best success when they are drawn out first, even if I don't actually follow the lines, it helps with the spacing and overall design.


Monday, September 26, 2016

Feather Quilting

Back in August, I managed to finish making some giant scrappy blocks from my abundance of green scraps, and turned it into this oversized churndash top.  
I even managed to do the quilting on the green part of the design before I left on vacation.   I used some of the Crayola washable markers to draw out the free-hand design.   I found that it really helped to keep the design flowing and pretty even.  You can see even from the back that this quilting is still pretty loose and free-flowing.

The next 3 photos are today's quilting.  I don't actually follow the lines very well, but having them drawn out to start with, improves the odds that the feathers will turn out like my brain imagines them.  I did a slightly different technique in today's section, backtracking only the ends of the feathers rather than the whole thing.  I think it really helps.  And you can really see the difference in the lower right section above where I didn't do that and the fact I can't follow the same line exactly is clear 


For the fill on the new sections, I was inspired by quilting from Ivory Spring Blog.  Go here to see the gorgeous feather variations.  My borrowed inspirations were the circular bits.  I took some plates and cups to mark some circles on the large sections I was planning to fill so I would have intentional, but random circle motifs to work around.  She uses more echoing and feather shape variations.  More things for me to work on.

I need to finish this up so I can start one of the 6 quilts I designed based upon designs from Kyiv's St Sophia Cathedral. Here are some hints of upcoming quilts:


Monday, August 29, 2016

Elephant

 The elephant quilt has been delivered.


So has the baby for whom it was made.  I found out a couple weeks before the shower that my co-worker's colors were yellow, grey and mint.  And the theme is elephants.  I found the print in my stash and it seemed perfect.  I bought it on sale and it's not in my usual color way to begin with. The elephant design was originally going to have a lot of applique, but the busy fabrics did the trick.

Found out from a co-worker that the expectant mom is a hockey fan.  So I worked some pucks into the background. 

The ear was lots of fun.  I added an extra layer of batting to make it puffy.  
While my FMQ is not going to win any awards, I am finally at a point that the final product actually looks like what I planned.  Progress.